Difference between revisions of "VMware ESXi on Mac Pro 3,1"
Jump to navigation
Jump to search
| Line 32: | Line 32: | ||
#: [[File:Macpro_31_vmware_9.png|700px]] | #: [[File:Macpro_31_vmware_9.png|700px]] | ||
# Enter a password to use for the '''root''' user account then press '''Enter''' to continue. | # Enter a password to use for the '''root''' user account then press '''Enter''' to continue. | ||
| − | #: [[File:Macpro_31_vmware_10.png]] | + | #: [[File:Macpro_31_vmware_10.png|700px]] |
# The installer will do another hardware check. | # The installer will do another hardware check. | ||
| − | #: [[File:Macpro_31_vmware_11.png]] | + | #: [[File:Macpro_31_vmware_11.png|700px]] |
# You will receive a warning that the CPU "may" be unsupported in future ESXi releases. This is the last release that will work. Press '''Enter''' to continue. | # You will receive a warning that the CPU "may" be unsupported in future ESXi releases. This is the last release that will work. Press '''Enter''' to continue. | ||
| − | #: [[File:Macpro_31_vmware_12.png]] | + | #: [[File:Macpro_31_vmware_12.png|700px]] |
# Press '''F11''' to confirm you want to install. | # Press '''F11''' to confirm you want to install. | ||
| − | #: [[File:Macpro_31_vmware_13.png]] | + | #: [[File:Macpro_31_vmware_13.png|700px]] |
# ESXi 6.5.0 will now be installed. | # ESXi 6.5.0 will now be installed. | ||
| − | #: [[File:Macpro_31_vmware_14.png]] | + | #: [[File:Macpro_31_vmware_14.png|700px]] |
# When installation is complete remove the CD/DVD/Usb stick and press '''Enter''' to reboot. | # When installation is complete remove the CD/DVD/Usb stick and press '''Enter''' to reboot. | ||
| − | #: [[File:Macpro_31_vmware_15.png]] | + | #: [[File:Macpro_31_vmware_15.png|700px]] |
| − | #: [[File:Macpro_31_vmware_16.png]] | + | #: [[File:Macpro_31_vmware_16.png|700px]] |
# After rebooting VMware ESXi will automatically start. | # After rebooting VMware ESXi will automatically start. | ||
| − | #: [[File:Macpro_31_vmware_17.png]] | + | #: [[File:Macpro_31_vmware_17.png|700px]] |
| − | #: [[File:Macpro_31_vmware_18.png]] | + | #: [[File:Macpro_31_vmware_18.png|700px]] |
# ESXi will automatically be assigned an IP address from your network using DHCP | # ESXi will automatically be assigned an IP address from your network using DHCP | ||
| − | #: [[File:Macpro_31_vmware_19.png]] | + | #: [[File:Macpro_31_vmware_19.png|700px]] |
== Accessing the ESXi web interface == | == Accessing the ESXi web interface == | ||
| Line 65: | Line 65: | ||
| − | [[File:Macpro_31_vmware_crash.png]] | + | [[File:Macpro_31_vmware_crash.png|700px]] |
Latest revision as of 01:19, 21 May 2021
Installing VMware ESXi on Apple hardware can be tricky, especially on older hardware. This page describes how to get a modern (ish) version of ESXi to work correctly on a Mac Pro 3,1 (early 2008).
To start you will need a free VMware account and access to https://my.vmware.com/
Downloading ESXi
- Go to https://my.vmware.com/web/vmware/details?downloadGroup=ESXI650&productId=614 and log in if required
- Select "6.5.0" in the Select Version dropdown
- Next to "VMware vSphere Hypervisor (ESXi ISO) image (Includes VMware Tools)" click Download Now
- You will now have the file "VMware-VMvisor-Installer-6.5.0-4564106.x86_64.iso" (sha1 4b71e69c606a54ae1c4b34341e341f1f6786d7b2)
- Burn the ISO image to a CD or DVD disc, or use a tool like rufus or Etcher to create a bootable USB stick.
Installing ESXi
- Power on your Mac Pro and hold Option until the boot device selection appears.
- Insert the CD/DVD/USB stick for ESXi.
- Select EFI Boot on the right using the arrow keys or mouse and press return
- The ESXI Installer will now start.
- The installer will take 5-10 minutes to fully load.
- Once loaded press Enter to continue.
- Press F11 (volume down) to confirm you have read the EULA.
- The installer will now scan for disks.
- Select the disk you would like to install to and press Enter
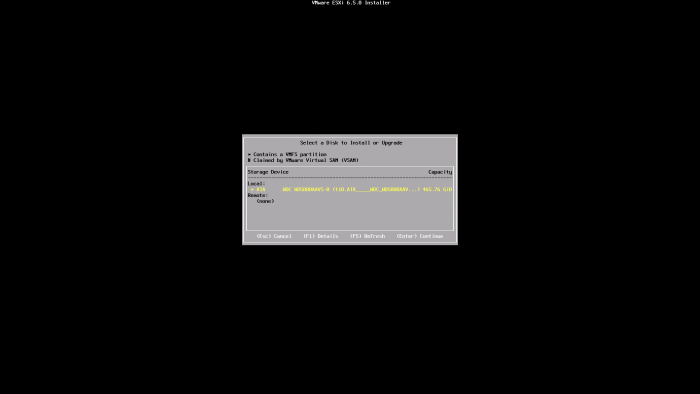
- Note: If the disk is not blank VMware ESXi may refuse to install. Boot macOS or a linux Live CD and use dd to overwrite the beginning of the disk. This process is not covered here.
- Choose your keyboard layout and press Enter
- Enter a password to use for the root user account then press Enter to continue.
- The installer will do another hardware check.
- You will receive a warning that the CPU "may" be unsupported in future ESXi releases. This is the last release that will work. Press Enter to continue.
- Press F11 to confirm you want to install.
- ESXi 6.5.0 will now be installed.
- When installation is complete remove the CD/DVD/Usb stick and press Enter to reboot.
- After rebooting VMware ESXi will automatically start.
- ESXi will automatically be assigned an IP address from your network using DHCP


Accessing the ESXi web interface
- Using a computer on the same network and a web browser go to the URL shown on the ESXi status screen.
- ESXi uses a self signed SSL certificate. To bypass the warning click Show Details and then visit this website. On the security popup confirm by clicking Visit Website
- At the prompt enter the username root and the password you set during the installation process and then click Log in
- Welcome to VMware ESXi 6.5.0 on your Mac Pro!


From this point forward ESXi will function normally and you should now install the free license available from VMware under your account page.
Because this is the last build of ESXi that supports this hardware you can not install any ESXi updates or you risk ESXi crashing on startup as shown below.
